> ## Documentation Index
> Fetch the complete documentation index at: https://crossmint-wallets-docs-2-5.mintlify.site/llms.txt
> Use this file to discover all available pages before exploring further.

# Quickstart ⚡

> Embed a checkout into a demo app in under 10 minutes

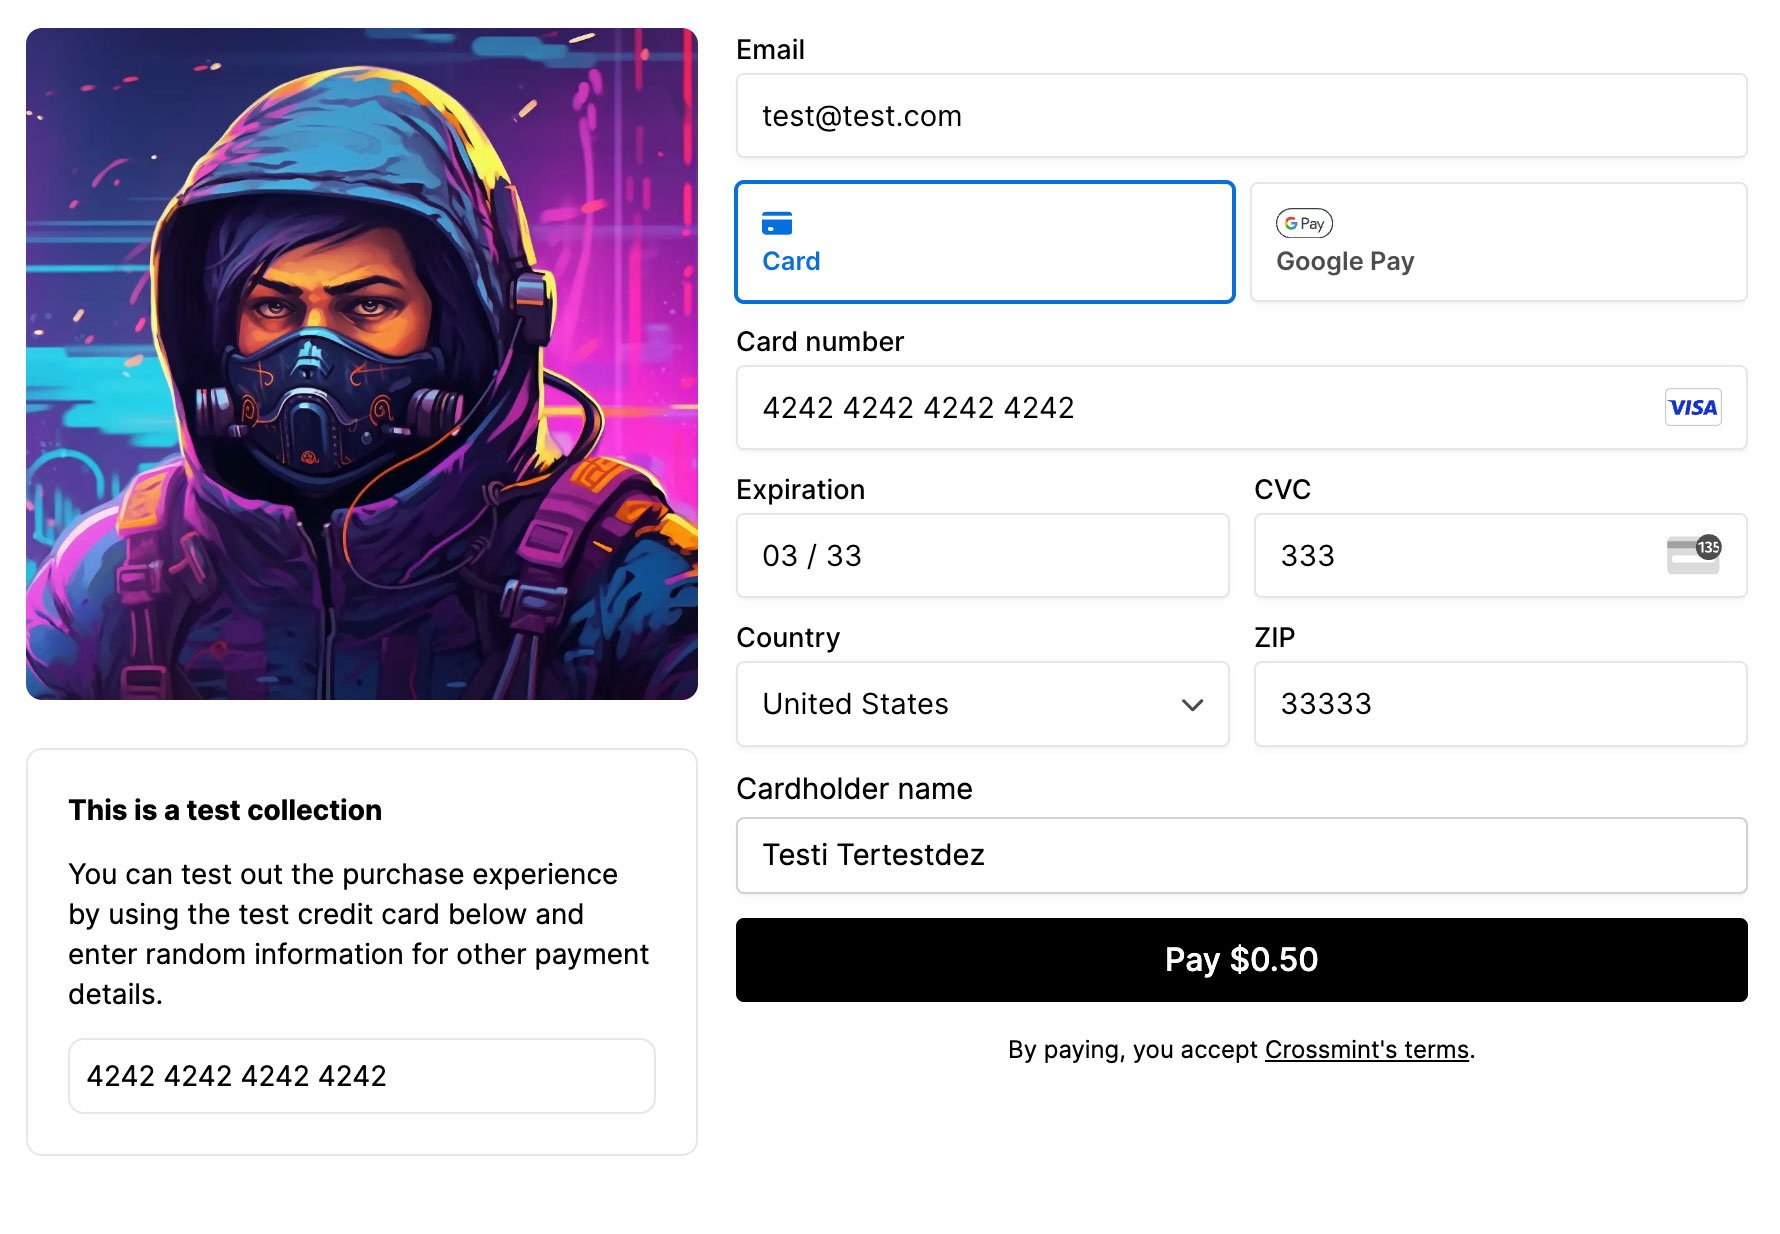
<Frame type="simple" caption="You will build this demo">
  <img src="https://mintcdn.com/crossmint-wallets-docs-2-5/l5RZBZ_vez8njfCH/images/payments/embedded/quickstart/start.jpg?fit=max&auto=format&n=l5RZBZ_vez8njfCH&q=85&s=bfff05102914ae1c0576af7cdef1e199" alt="Crossmint Embedded Digital Asset Checkout Demo" width="1780" height="1234" data-path="images/payments/embedded/quickstart/start.jpg" />
</Frame>

## Introduction

In this guide, you will build a demo site with nextjs and Crossmint's embedded digital asset checkout. You can follow step-by-step below or simply [clone this repo](https://github.com/Crossmint/crossmint-embedded-demo) to be up and running immediately.
<Snippet file="payments-prereqs.mdx" />

<Snippet file="payments-setup.mdx" />

### Integrate the embedded checkout

<Steps>
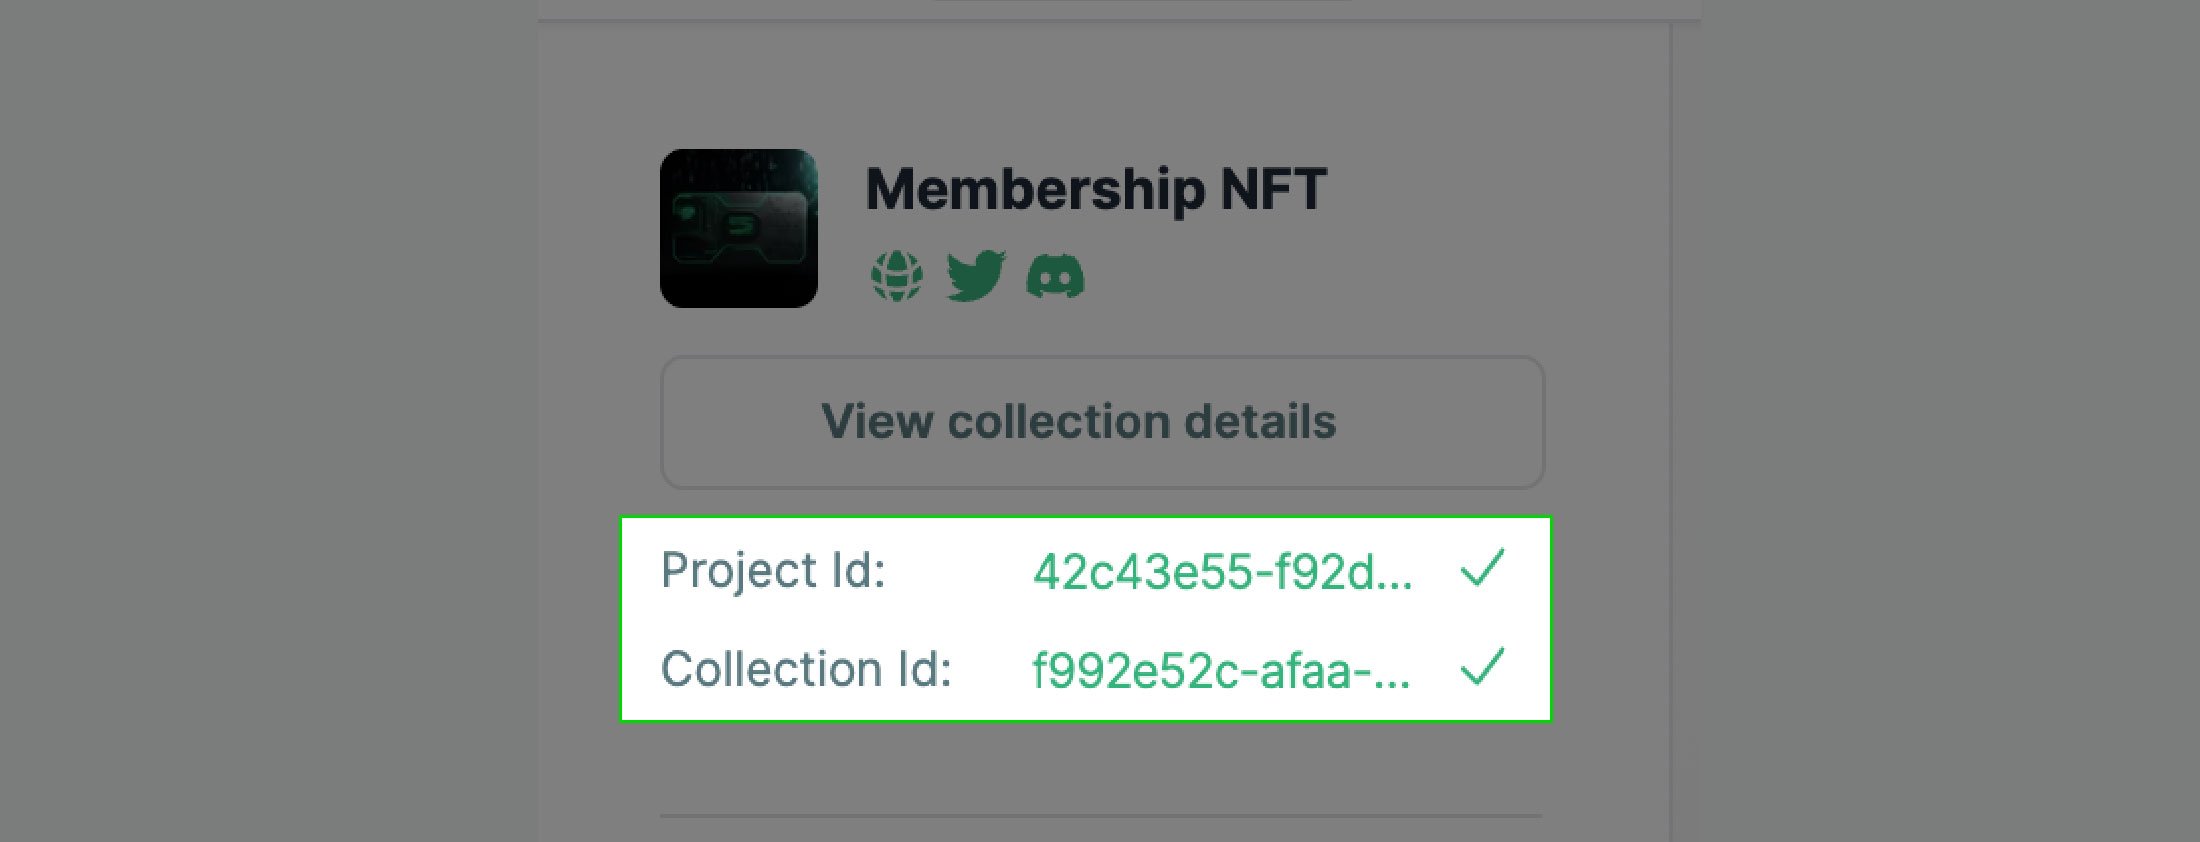
  <Step title="Obtain your `projectId` and `collectionId` from your collection detail view in the console">
    <Frame type="simple">
      <img src="https://mintcdn.com/crossmint-wallets-docs-2-5/l5RZBZ_vez8njfCH/images/payments/shared/project-id-collection-id.jpg?fit=max&auto=format&n=l5RZBZ_vez8njfCH&q=85&s=8dd1af5a80336ae305ca3b177422dfe6" alt="Get projectId and collectionId values screenshot" width="2200" height="842" data-path="images/payments/shared/project-id-collection-id.jpg" />
    </Frame>
  </Step>

  <Step title="Add a new file named `.env.local` to the root directory of your project">
    Set your environment variables with the `projectId` and `collectionId` values obtained in Step 1

    <Check>These values are safe to use in the client side of your application and are not considered sensitive.</Check>

    ```git .env.local theme={null}
    NEXT_PUBLIC_PROJECT_ID="_YOUR_PROJECT_ID_"
    NEXT_PUBLIC_COLLECTION_ID="_YOUR_COLLECTION_ID_"
    NEXT_PUBLIC_ENVIRONMENT="staging"
    ```
  </Step>

  <Step title="Open the `/src/app/page.tsx` file in your editor">
    Replace the entire contents with the following:

    <CodeGroup>
      ```tsx EVM theme={null}
      "use client";

      import { CrossmintPaymentElement } from "@crossmint/client-sdk-react-ui";

      export default function Home() {
        const projectId = process.env.NEXT_PUBLIC_PROJECT_ID as string;
        const collectionId = process.env.NEXT_PUBLIC_COLLECTION_ID as string;
        const environment = process.env.NEXT_PUBLIC_ENVIRONMENT as string;

        return (
          <div>
            <CrossmintPaymentElement
              projectId={projectId}
              collectionId={collectionId}
              environment={environment}
              cardWalletPaymentMethods={["apple-pay", "google-pay"]}
              emailInputOptions={{
                show: true,
              }}
              mintConfig={{
                type: "erc-721",
                totalPrice: "0.001",
              }}
            />
          </div>
        )
      }
      ```

      ```tsx Solana theme={null}
        // the mintConfig object isn't required for integrations
        // using a candy machine

        <CrossmintPaymentElement
          projectId={projectId}
          collectionId={collectionId}
          environment={environment}
          cardWalletPaymentMethods={["apple-pay", "google-pay"]}
          emailInputOptions={{
            show: true,
          }}
        />
      ```
    </CodeGroup>

    `cardWalletPaymentMethods` allows you to configure Apple Pay and Google Pay for the checkout. Please ensure that you restrict the experience to only show Apple Pay on compatible browsers and devices. If only Apple Pay is allowed, users will not be able to use the checkout on non-Safari browsers and other incompatible devices.

    If you are only displaying **Google Pay** and **Apple Pay**, an email input is not required. You can set `show` to `false` under `emailInputOptions`. You can also choose to hide the card form if you are only displaying Google Pay and Apple Pay, click [here](/payments/embedded/ui-customization) to learn more.
  </Step>

  <Step title="Run the application from your terminal">
    ```bash theme={null}
    pnpm dev
    ```
  </Step>
</Steps>

Open the app in your browser with the url `http://localhost:3000/`.

The Crossmint Embedded digital asset checkout will now function correctly, but is missing some important features such as UI updates based on the payment status, and handling error states. The following sections will expand on the work you have done so far to incorporate these missing features.

## Organize Project Files

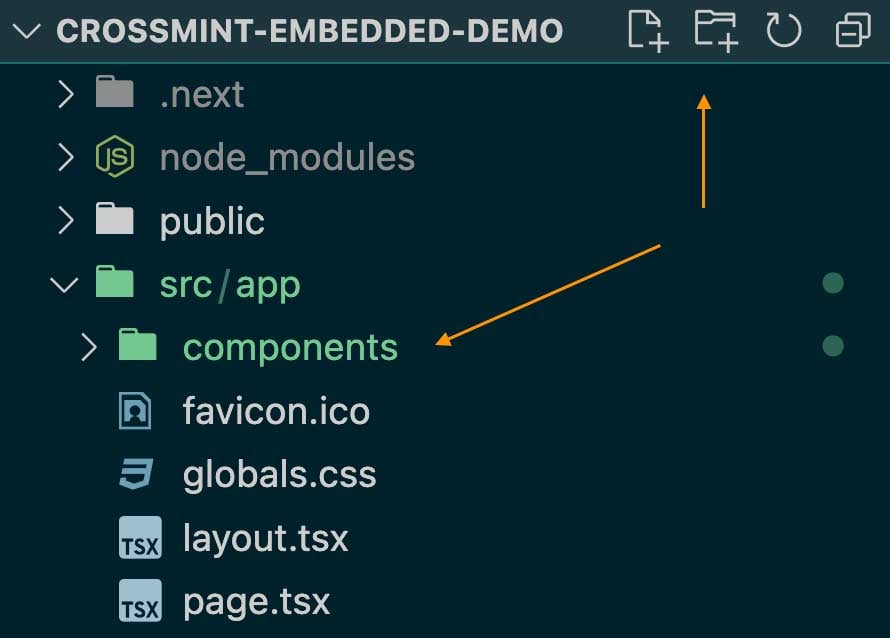
Before proceeding, take a moment to organize the project files as follows:

<Accordion title="Organize the Project Files">
  Create a new `components` folder within the `/src/app` folder of your project.

  <img src="https://mintcdn.com/crossmint-wallets-docs-2-5/l5RZBZ_vez8njfCH/images/payments/embedded/quickstart/structure.jpg?fit=max&auto=format&n=l5RZBZ_vez8njfCH&q=85&s=ba7012b0129075747f53c9d19e839073" width="300" data-path="images/payments/embedded/quickstart/structure.jpg" />

  Within the new `components` folder add two new files named:

  1. `Crossmint.tsx`
  2. `CollectionInfo.tsx`
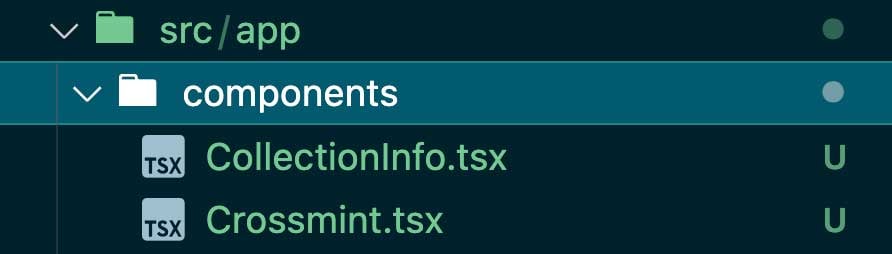
  <img src="https://mintcdn.com/crossmint-wallets-docs-2-5/l5RZBZ_vez8njfCH/images/payments/embedded/quickstart/add.jpg?fit=max&auto=format&n=l5RZBZ_vez8njfCH&q=85&s=207e1d83db2e98f7013b1acfd08d0eaf" width="300" data-path="images/payments/embedded/quickstart/add.jpg" />

  Below is the new content for these pages:

  <CodeGroup>
    ```tsx page.tsx theme={null}
    import CollectionInfo from "./components/CollectionInfo";
    import Crossmint from "./components/Crossmint";

    export default function Home() {
      return (
        <div className="container mx-auto max-w-4xl bg-white">
          <div className="grid grid-cols-1 sm:grid-cols-5 sm:gap-4 p-4">
            <CollectionInfo />
            <Crossmint />
          </div>
        </div>
      );
    }
    ```

    ```tsx CollectionInfo.tsx theme={null}
    import Image from "next/image";
    import React from "react";

    const CollectionInfo: React.FC = () => {
        return (
            <>
                <div className="sm:col-span-2 flex flex-col">
                    <Image
                        src="/ninjanaut.jpg"
                        width={500}
                        height={500}
                        className="rounded-lg shrink"
                        alt="digital asset collection image"
                        priority={true}
                    />
                    <div className="justify-between p-5 my-6 space-y-3 rounded-lg border">
                        <p className="text-sm text-black font-bold">This is a test collection</p>
                        <p className="text-sm text-black ">
                            You can test out the purchase experience by using the test credit card below and enter random
                            information for other payment details.
                        </p>
                        <div className="w-full p-2 border rounded-lg">
                            <div className="cursor-pointer flex items-start gap-1 text-black justify-between">
                                <p className="text-black text-sm">4242 4242 4242 4242</p>
                            </div>
                        </div>
                    </div>
                </div>
            </>
        );
    };

    export default CollectionInfo;
    ```

    ```tsx Crossmint.tsx theme={null}
    "use client";

    import { CrossmintPaymentElement } from "@crossmint/client-sdk-react-ui";

    const Crossmint: React.FC = () => {
        const projectId = process.env.NEXT_PUBLIC_PROJECT_ID as string;
        const collectionId = process.env.NEXT_PUBLIC_COLLECTION_ID as string;
        const environment = process.env.NEXT_PUBLIC_ENVIRONMENT as string;

        return (
            <>
                <div className="sm:col-span-3">
                    <CrossmintPaymentElement
                        projectId={projectId}
                        collectionId={collectionId}
                        environment={environment}
                        emailInputOptions={{
                            show: true,
                        }}
                        mintConfig={{
                            type: "erc-721",
                            totalPrice: "0.0001",
                        }}
                        onEvent={(event) => {
                            console.log(event);
                        }}
                    />
                </div>
            </>
        );
    };

    export default Crossmint;
    ```
  </CodeGroup>
</Accordion>

Optionally, you can set a collection image to make the demo more visual:

<Accordion title="Set a collection image">
  If you want to display a collection picture, download the image below, name it `ninjanaut.jpg`, and save it in the `/public` folder.

  <img src="https://mintcdn.com/crossmint-wallets-docs-2-5/l5RZBZ_vez8njfCH/images/payments/embedded/quickstart/ninjanaut.jpg?fit=max&auto=format&n=l5RZBZ_vez8njfCH&q=85&s=f10b30159ffdf7f1735509fac9f45e59" width="300" data-path="images/payments/embedded/quickstart/ninjanaut.jpg" />

  Check your application in the browser again to ensure everything is rendering properly and you don't have any errors in the javascript console.
</Accordion>

## Update the UI based on the purchase status

[Events](/payments/embedded/events) will notify you of the purchase processing status. You can use these updates to build interactive experiences.

The following steps will show you how to listen to events and update your website based on their content.

<AccordionGroup>
  <Accordion title="1. Listen to Payment Events">
    Payment events provide updates on the status of payments. You can subscribe by adding an `onEvent` handler to the `CrossmintPaymentElement`. The example above already includes the handler in `Crossmint.tsx`, with logic to log all events to the console.

    Try it out by opening your javascript console, interacting with the form, and observing the corresponding events being logged to the console.

    The `payment:process.succeeded` event will fire when the payment has been successfully captured.
  </Accordion>

  <Accordion title="2. Display the Progress">
    In this step, you will replace the checkout form with a loading component, to notify the user the purchase is in progress.

    1. Create a new file named `Minting.tsx`, in the same components directory, with the code below.
    2. Update the `Crossmint.tsx` file with the code on the other tab below.
    3. Download this loading sphere animation, name it `sphere.gif`, and save it to the `/public` folder.

    <img src="https://mintcdn.com/crossmint-wallets-docs-2-5/l5RZBZ_vez8njfCH/images/payments/embedded/quickstart/sphere.gif?s=f1c8e8162bbbe824d642459d40e9a8cb" width="300" data-path="images/payments/embedded/quickstart/sphere.gif" />

    <CodeGroup>
      ```tsx Minting.tsx theme={null}
      import Image from "next/image";
      import React from "react";

      interface MintingProps {
          orderIdentifier: string;
      }

      const Minting: React.FC<MintingProps> = ({ orderIdentifier }) => {
          return (
              <div className="text-black font-mono p-5 text-center">
                  <h3>Minting your digital asset...</h3>
                  <Image
                      src="/sphere.gif"
                      width={256}
                      height={256}
                      className="shrink mx-auto mt-10"
                      alt="processing animation"
                  />
              </div>
          );
      };

      export default Minting;
      ```

      ```tsx Crossmint.tsx theme={null}
      "use client";

      import { CrossmintPaymentElement } from "@crossmint/client-sdk-react-ui";
      import React, { useState } from "react";

      import Minting from "./Minting";

      const Crossmint: React.FC = () => {
          const [orderIdentifier, setOrderIdentifier] = useState<string | null>(null);

          const projectId = process.env.NEXT_PUBLIC_PROJECT_ID as string;
          const collectionId = process.env.NEXT_PUBLIC_COLLECTION_ID as string;
          const environment = process.env.NEXT_PUBLIC_ENVIRONMENT as string;

          return (
              <>
                  <div className="sm:col-span-3">
                      {orderIdentifier === null ? (
                          <CrossmintPaymentElement
                              projectId={projectId}
                              collectionId={collectionId}
                              environment={environment}
                              emailInputOptions={{
                                  show: true,
                              }}
                              mintConfig={{
                                  type: "erc-721",
                                  totalPrice: "0.0001",
                              }}
                              onEvent={(event) => {
                                  switch (event.type) {
                                      case "payment:process.succeeded":
                                          console.log(event);
                                          setOrderIdentifier(event.payload.orderIdentifier);
                                          break;
                                      default:
                                          console.log(event);
                                          break;
                                  }
                              }}
                          />
                      ) : (
                          <Minting orderIdentifier={orderIdentifier} />
                      )}
                  </div>
              </>
          );
      };

      export default Crossmint;
      ```
    </CodeGroup>

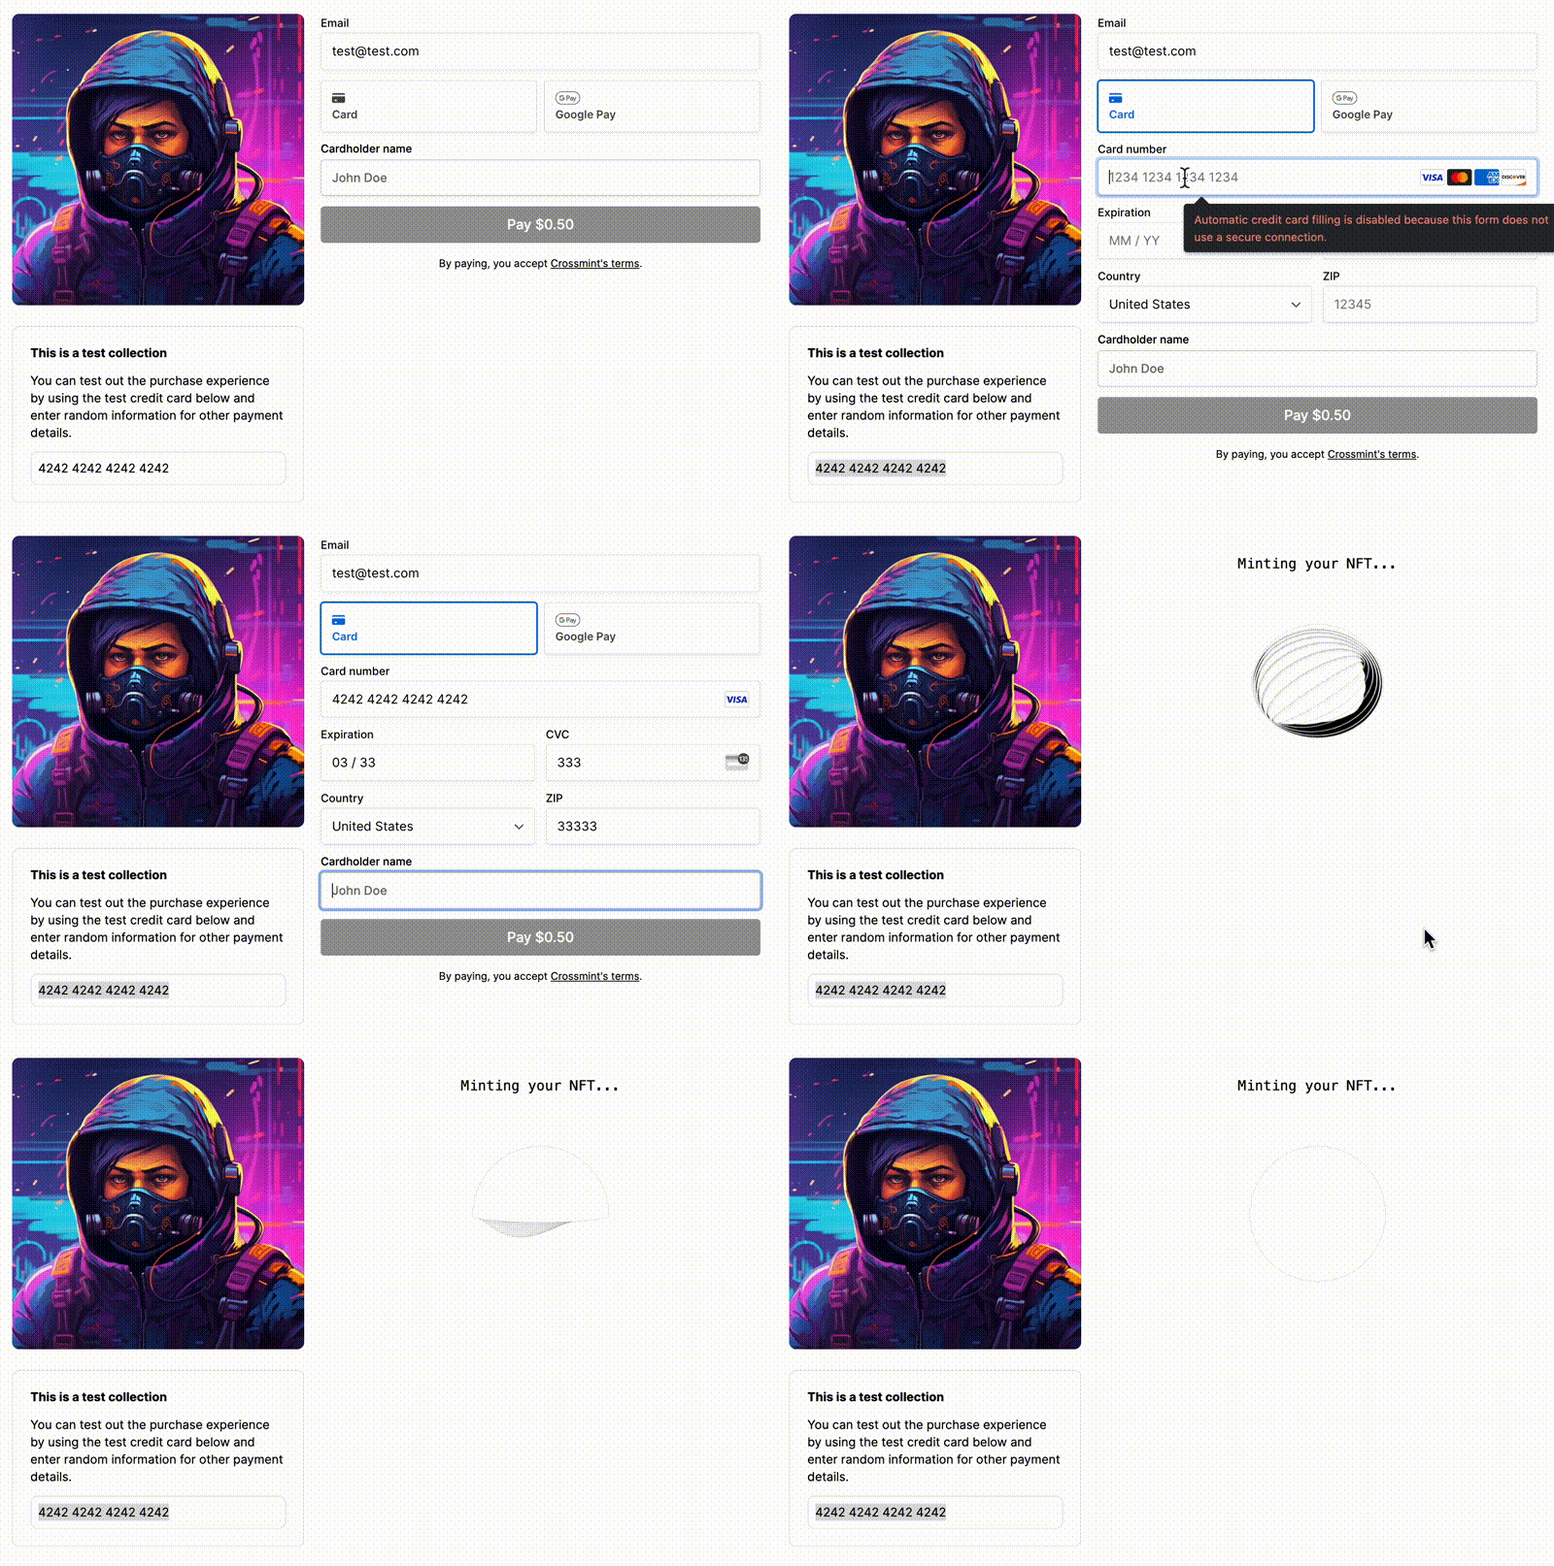
    Run the app and complete a test payment using the card `4242 4242 4242 4242`, with any arbitrary data for the other fields. You should see something like the following flow:

    <Frame type="simple">
      <img src="https://mintcdn.com/crossmint-wallets-docs-2-5/l5RZBZ_vez8njfCH/images/payments/embedded/quickstart/checkout-minting.gif?s=40d49201be9650b7246c3f8bd3862c31" alt="GIF of checkout form being replaced with processing component" width="800" height="538" data-path="images/payments/embedded/quickstart/checkout-minting.gif" />
    </Frame>
  </Accordion>

  <Accordion title="3. Show Minting Status">
    Next, you will listen to mint events to get notified when the digital asset has been successfully delivered. These events will return the transaction ID, which you can use to generate a link to view the digital asset on OpenSea, PolygonScan, and Crossmint.

    To do this, ensure your app matches the directory structure listed below, and update the `Minting.tsx` file as outlined in the second tab.

    <CodeGroup>
      ```bash directory structure theme={null}
      /src/app/
        ├─layout.tsx
        ├─page.tsx
        └── components/
            ├─ CollectionInfo.tsx
            ├─ Crossmint.tsx
            └─ Minting.tsx
        public/
        ├─ ninjanaut.jpg
        └─ sphere.gif
      ```

      ```tsx Minting.tsx theme={null}
      import { useCrossmintEvents } from "@crossmint/client-sdk-react-ui";
      import Image from "next/image";
      import React from "react";

      interface MintingProps {
          orderIdentifier: string;
      }

      const Minting: React.FC<MintingProps> = ({ orderIdentifier }) => {
          const [status, setStatus] = React.useState<string>("pending"); // ["pending", "success", "failure"]
          const [result, setResult] = React.useState<any>(null);
          const environment = process.env.NEXT_PUBLIC_ENVIRONMENT as string;
          const { listenToMintingEvents } = useCrossmintEvents({
              environment: environment,
          });

          if (status === "pending") {
              listenToMintingEvents({ orderIdentifier }, (event) => {
                  switch (event.type) {
                      case "transaction:fulfillment.succeeded":
                          setStatus("success");
                          setResult(event.payload);
                          break;
                      case "transaction:fulfillment.failed":
                          setStatus("failure");
                          break;
                      default:
                          break;
                  }
                  console.log(event.type, ":", event);
              });
          }

          return (
              <>
                  <div className="text-black font-mono p-5 text-center">
                      {status === "pending" && (
                          <>
                              <h3>Minting your digital asset...</h3>
                              <Image
                                  src="/sphere.gif"
                                  width={256}
                                  height={256}
                                  className="shrink mx-auto mt-10"
                                  alt="processing animation"
                              />
                              This may take up to a few minutes
                          </>
                      )}
                      {status === "success" && (
                          <>
                              <h3>Digital Asset Minted Successfully!</h3>
                              <div className="mt-10">
                                  <a
                                      target="_blank"
                                      className="block bg-[#2081e2] rounded-lg mt-3 p-3 text-white"
                                      href={`https://testnets.opensea.io/assets/amoy/${result?.contractAddress}/${result?.tokenIds[0]}`}
                                  >
                                      View on OpenSea
                                  </a>
                                  <a
                                      target="_blank"
                                      className="block bg-[#663399] rounded-lg mt-3 p-3 text-white"
                                      href={`https://amoy.polygonscan.com/tx/${result?.txId}`}
                                  >
                                      View on Polygonscan
                                  </a>
                                  <a
                                      target="_blank"
                                      className="block bg-[#81feab] rounded-lg mt-3 p-3 text-black"
                                      href={`https://staging.crossmint.com/user/collection/poly:${result?.contractAddress}:${result?.tokenIds[0]}`}
                                  >
                                      View in Crossmint
                                  </a>
                              </div>
                          </>
                      )}
                      {status === "failure" && (
                          <>
                              <h3>Failed to Mint Digital Asset</h3>
                              <p>Something went wrong. You will be refunded if the mint cannot be fulfilled successfully.</p>
                          </>
                      )}
                  </div>
              </>
          );
      };

      export default Minting;
      ```
    </CodeGroup>
  </Accordion>
</AccordionGroup>

For a full explanation of all available events, see the [advanced guide](/payments/embedded/events).

## All Set!

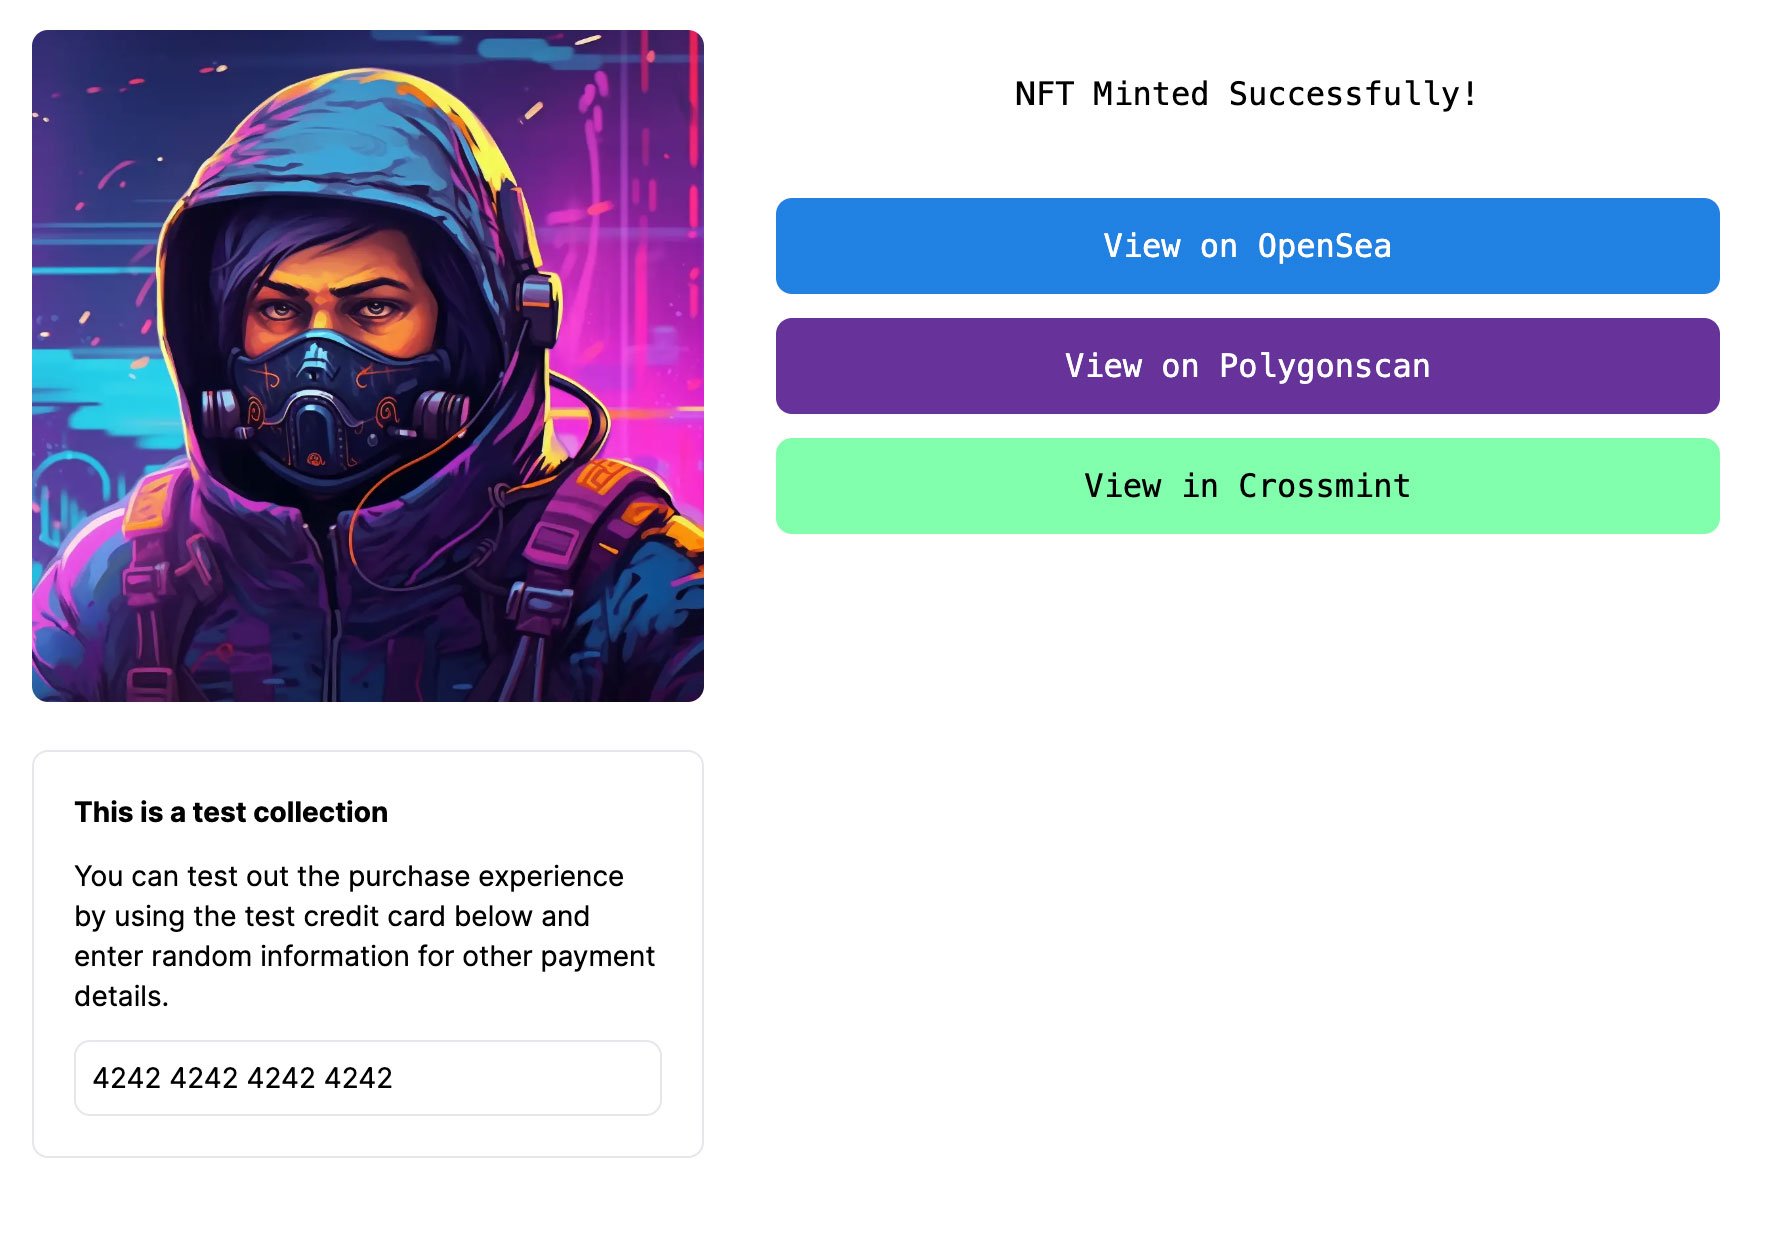
You can now perform an end-to-end test of a purchase in your browser. You should end up with the following successful screen with links to view the digital asset.

<Note>
  Remember this demo is built on staging, so the digital assets will show up on the testnets. To launch on production,
  check the [production launch checklist](/payments/advanced/production-launch). You will need to contact
  [Sales](https://www.crossmint.com/contact/sales) to enable the embedded checkout on production.
</Note>

<Frame type="simple">
  <img src="https://mintcdn.com/crossmint-wallets-docs-2-5/l5RZBZ_vez8njfCH/images/payments/embedded/quickstart/final.jpg?fit=max&auto=format&n=l5RZBZ_vez8njfCH&q=85&s=443b6c9bac246269b62b816d163094cb" width="1792" height="1236" data-path="images/payments/embedded/quickstart/final.jpg" />
</Frame>

## Next Steps

Now you have a working demo of the Embedded Checkout. If you're ready to dig into the details of the configuration options and advanced features, check out the following sections:

<CardGroup cols={3}>
  <Card title="SDK Reference" icon="gear" iconType="duotone" color="9E9E9E" href="/payments/advanced/component-properties" />

  <Card title="Launch in Production" icon="ship" iconType="duotone" color="3AA9D8" href="/payments/advanced/production-launch" />

  <Card title="Crypto Payments" icon="coins" iconType="duotone" color="F4E964" href="/payments/embedded/pay-with-crypto" />

  <Card title="Localization" icon="globe" iconType="duotone" color="1983EF" href="/payments/advanced/localization" />

  <Card title="Multi-purchases" icon="cart-plus" iconType="duotone" color="FF7C9F" href="/payments/advanced/selling-multiple-nfts" />

  <Card title="USDC support" icon="dollar-sign" iconType="duotone" color="116A32" href="/payments/advanced/usdc-support" />
</CardGroup>