> ## Documentation Index
> Fetch the complete documentation index at: https://crossmint-wallets-docs-2-5.mintlify.site/llms.txt
> Use this file to discover all available pages before exploring further.
# Pay with USDC
> Buy or sell any tokenized asset with USDC, in an API call
## Introduction
This guide will show you how to quickly buy or sell any tokenized asset (NFT) with USDC, using Crossmint's headless APIs.
## Prerequisites
## External prerequisites
Crypto wallet supporting USDC - [Metamask](https://metamask.io/), [Phantom](https://phantom.app/), [Coinbase Wallet](https://www.coinbase.com/settings/wallet), etc.
A small balance of **USDC** testnet currency in your wallet on the **Base-sepolia** network.
Get testnet USDC here:
* [Crossmint USDC Faucet (Base-sepolia)](https://usdc-faucet.vercel.app/)
The above faucet provides both USDC and USDXM. This quickstart uses USDC by default, but you can also use USDXM (see contract address below).
USDXM is a test token that represents USDC. It has the same behavior as USDC. In production, you'll use real USDC instead.
**Adding USDC to MetaMask:**
* Import the token to MetaMask:
1. Open MetaMask and click "Import tokens"
2. For USDC: Use the official USDC contract address from Circle `0x036CbD53842c5426634e7929541eC2318f3dCF7e`
3. For USDXM: Use the USDXM contract address `0x14196F08a4Fa0B66B7331bC40dd6bCd8A1dEeA9F`
4. Click Import
5. Refresh your wallet
## Create an order and pay with USDC
Clone the quickstart repo:
```bash theme={null}
git clone https://github.com/crossmint/headless-python-payusdc.git
```
Navigate to the project directory and create a virtual environment:
```bash theme={null}
cd headless-python-payusdc
python3 -m venv .venv
source .venv/bin/activate
```
Install the dependencies:
```bash theme={null}
pip install -r requirements.txt
```
Set the following keys in the `.env` file:
```bash theme={null}
CROSSMINT_API_KEY=""
COLLECTION_ID=""
PAYER_ADDRESS=""
EMAIL_ADDRESS=""
```
* `CROSSMINT_API_KEY`, `COLLECTION_ID` are found from the [Developer Console](https://staging.crossmint.com/console/). See [Prerequisites](#prerequisites)
* `PAYER_ADDRESS` is your wallet address that contains USDC.
* `EMAIL_ADDRESS` is where you'll receive your NFT in a new Crossmint wallet that you can access later.
Run the application:
```bash theme={null}
python src/index.py
```
This will:
1. Create an order that is waiting for a **USDC** payment on the **Base-sepolia** network
2. Return the **serializedTransaction**, which will be used in the next step
3. Poll the status of the order until it is complete
 1. Copy the `serializedTransaction` returned in the previous step and paste it below
2. Connect to your USDC wallet that was specified in the `.env` file
3. Send the transaction
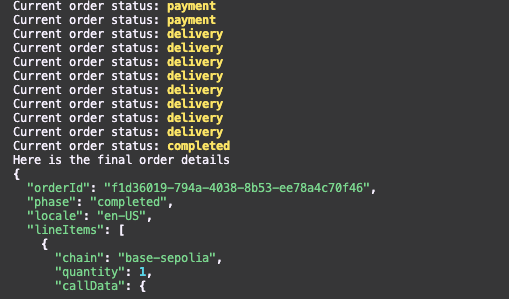
The code will poll for the status of the order until it is marked as complete.
You should see it changing from "payment" to "delivery" and finally to "completed".
You will also see the final order details, including the transaction hash, in your terminal.
1. Copy the `serializedTransaction` returned in the previous step and paste it below
2. Connect to your USDC wallet that was specified in the `.env` file
3. Send the transaction
The code will poll for the status of the order until it is marked as complete.
You should see it changing from "payment" to "delivery" and finally to "completed".
You will also see the final order details, including the transaction hash, in your terminal.
 ## Access your NFT
Once the order is complete, you will receive an email with a link to the purchased item, which can be viewed in the Crossmint website.
You can also access your NFT by logging in to your Crossmint wallet at
[crossmint.com](https://staging.crossmint.com/user/collection) with the email address you specified in the `.env`
file.
## Understanding the code
### Creating an order
The order creation process involves sending a POST request to Crossmint's API with the necessary payment and recipient details. Let's break down the key components:
```python src/create_order.py theme={null}
def create_order():
# Define the order data structure
order_data = {
"recipient": {
"email": os.environ.get("EMAIL_ADDRESS") # Email where the NFT will be delivered
},
"locale": "en-US", # Language/region setting
"payment": {
"method": "base-sepolia", # Testnet network for USDC payments
"currency": "usdc", # Payment currency
"payerAddress": os.environ.get("PAYER_ADDRESS") # Wallet address paying USDC
},
"lineItems": {
"collectionLocator": f"crossmint:{os.environ.get('COLLECTION_ID')}" # Tokenized collection identifier
}
}
```
#### Key parameters explained
* **recipient**: Specifies where to deliver the tokenized asset
* `email`: The email address where the tokenized asset will be delivered in a Crossmint wallet.
Instead of an email, a `walletAddress` field can be used to deliver the asset to a specific wallet address.
* **payment**: Defines how the payment will be made
* `method`: The blockchain network (`base-sepolia` for testnet)
* `currency`: The payment currency (`usdc`)
* `payerAddress`: The wallet address that will send the USDC payment
* **lineItems**: Specifies what is being purchased
* `collectionLocator`: Identifies the collection
#### API request
```python src/create_order.py theme={null}
response = requests.post(
f"{base_url}/orders",
headers={
"Content-Type": "application/json",
"x-api-key": os.environ.get("CROSSMINT_API_KEY") # Your API key for authentication
},
json=order_data
)
```
The API request:
* Sends a POST request to Crossmint's order endpoint
* Includes your API key for authentication
* Sends the order data as JSON in the request body
#### Response handling
```python src/create_order.py theme={null}
validate(response.ok, f"Failed to create order: {response.reason}")
json_response = response.json()
return {
"clientSecret": json_response["clientSecret"], # Used for order authentication
"order": json_response["order"] # Contains order details
}
```
The response includes:
* `clientSecret`: A unique token used for authenticating subsequent requests for this order
* `order`: The order details including the order ID and status
For more details on creating orders via the headless API, see the [Create Order API Reference](/api-reference/headless/create-order).
### Polling an order
The order status polling process involves periodically checking the order's status until it's completed. Let's examine how this works:
```python src/get_order.py theme={null}
def get_order(order_id: str, client_secret: str) -> Dict[str, Any]:
try:
response = requests.get(
f"{base_url}/orders/{order_id}", # Endpoint for specific order
headers={
'Content-Type': 'application/json',
'x-api-key': os.environ.get('CROSSMINT_API_KEY'), # API authentication
'Authorization': client_secret # Order-specific authentication
}
)
validate(response.ok, f"Failed to get order: {response.reason}")
return response.json()
except Exception as error:
raise error
```
#### Get order function explained
* Takes `order_id` and `client_secret` as parameters
* Makes a GET request to fetch the current state of the order
* Uses both API key and client secret for authentication
* Returns the order details as JSON
```python src/get_order.py theme={null}
def poll_order(order_id: str, client_secret: str) -> Dict[str, Any]:
while True:
try:
order = get_order(order_id, client_secret)
print(f'Current order status: [bold yellow]{order["phase"]}[/bold yellow]')
if order['phase'] == 'completed':
return order
time.sleep(3) # Wait 3 seconds before next check
except Exception as error:
raise error
```
#### Poll order function explained
* Continuously checks the order status every 3 seconds.
* Prints the current phase of the order
* Possible order phases include:
* `payment`: Waiting for or processing payment
* `delivery`: NFT is being delivered
* `completed`: Order is successfully completed
* Returns the final order details when completed
The 3-second polling interval helps prevent rate limiting while still providing timely updates. Adjust this value based on your needs.
For more details on polling for order status, see the [Get Order API Reference](/api-reference/headless/get-order).
Always implement proper error handling, retry mechanisms, and asynchronous polling in production environments to
handle network issues or API interruptions.
## Access your NFT
Once the order is complete, you will receive an email with a link to the purchased item, which can be viewed in the Crossmint website.
You can also access your NFT by logging in to your Crossmint wallet at
[crossmint.com](https://staging.crossmint.com/user/collection) with the email address you specified in the `.env`
file.
## Understanding the code
### Creating an order
The order creation process involves sending a POST request to Crossmint's API with the necessary payment and recipient details. Let's break down the key components:
```python src/create_order.py theme={null}
def create_order():
# Define the order data structure
order_data = {
"recipient": {
"email": os.environ.get("EMAIL_ADDRESS") # Email where the NFT will be delivered
},
"locale": "en-US", # Language/region setting
"payment": {
"method": "base-sepolia", # Testnet network for USDC payments
"currency": "usdc", # Payment currency
"payerAddress": os.environ.get("PAYER_ADDRESS") # Wallet address paying USDC
},
"lineItems": {
"collectionLocator": f"crossmint:{os.environ.get('COLLECTION_ID')}" # Tokenized collection identifier
}
}
```
#### Key parameters explained
* **recipient**: Specifies where to deliver the tokenized asset
* `email`: The email address where the tokenized asset will be delivered in a Crossmint wallet.
Instead of an email, a `walletAddress` field can be used to deliver the asset to a specific wallet address.
* **payment**: Defines how the payment will be made
* `method`: The blockchain network (`base-sepolia` for testnet)
* `currency`: The payment currency (`usdc`)
* `payerAddress`: The wallet address that will send the USDC payment
* **lineItems**: Specifies what is being purchased
* `collectionLocator`: Identifies the collection
#### API request
```python src/create_order.py theme={null}
response = requests.post(
f"{base_url}/orders",
headers={
"Content-Type": "application/json",
"x-api-key": os.environ.get("CROSSMINT_API_KEY") # Your API key for authentication
},
json=order_data
)
```
The API request:
* Sends a POST request to Crossmint's order endpoint
* Includes your API key for authentication
* Sends the order data as JSON in the request body
#### Response handling
```python src/create_order.py theme={null}
validate(response.ok, f"Failed to create order: {response.reason}")
json_response = response.json()
return {
"clientSecret": json_response["clientSecret"], # Used for order authentication
"order": json_response["order"] # Contains order details
}
```
The response includes:
* `clientSecret`: A unique token used for authenticating subsequent requests for this order
* `order`: The order details including the order ID and status
For more details on creating orders via the headless API, see the [Create Order API Reference](/api-reference/headless/create-order).
### Polling an order
The order status polling process involves periodically checking the order's status until it's completed. Let's examine how this works:
```python src/get_order.py theme={null}
def get_order(order_id: str, client_secret: str) -> Dict[str, Any]:
try:
response = requests.get(
f"{base_url}/orders/{order_id}", # Endpoint for specific order
headers={
'Content-Type': 'application/json',
'x-api-key': os.environ.get('CROSSMINT_API_KEY'), # API authentication
'Authorization': client_secret # Order-specific authentication
}
)
validate(response.ok, f"Failed to get order: {response.reason}")
return response.json()
except Exception as error:
raise error
```
#### Get order function explained
* Takes `order_id` and `client_secret` as parameters
* Makes a GET request to fetch the current state of the order
* Uses both API key and client secret for authentication
* Returns the order details as JSON
```python src/get_order.py theme={null}
def poll_order(order_id: str, client_secret: str) -> Dict[str, Any]:
while True:
try:
order = get_order(order_id, client_secret)
print(f'Current order status: [bold yellow]{order["phase"]}[/bold yellow]')
if order['phase'] == 'completed':
return order
time.sleep(3) # Wait 3 seconds before next check
except Exception as error:
raise error
```
#### Poll order function explained
* Continuously checks the order status every 3 seconds.
* Prints the current phase of the order
* Possible order phases include:
* `payment`: Waiting for or processing payment
* `delivery`: NFT is being delivered
* `completed`: Order is successfully completed
* Returns the final order details when completed
The 3-second polling interval helps prevent rate limiting while still providing timely updates. Adjust this value based on your needs.
For more details on polling for order status, see the [Get Order API Reference](/api-reference/headless/get-order).
Always implement proper error handling, retry mechanisms, and asynchronous polling in production environments to
handle network issues or API interruptions.